Master and pupil (John Shaner's Nail Knot Tutorial)
Moderators: William Anderson, letumgo
Master and pupil (John Shaner's Nail Knot Tutorial)
William Anderson, John Shaner and I hung out in the evenings during the Arts of the Angler show in Danbury, Conn.
Both nights, after dinner we gathered in one of the hotel rooms for show and tell.
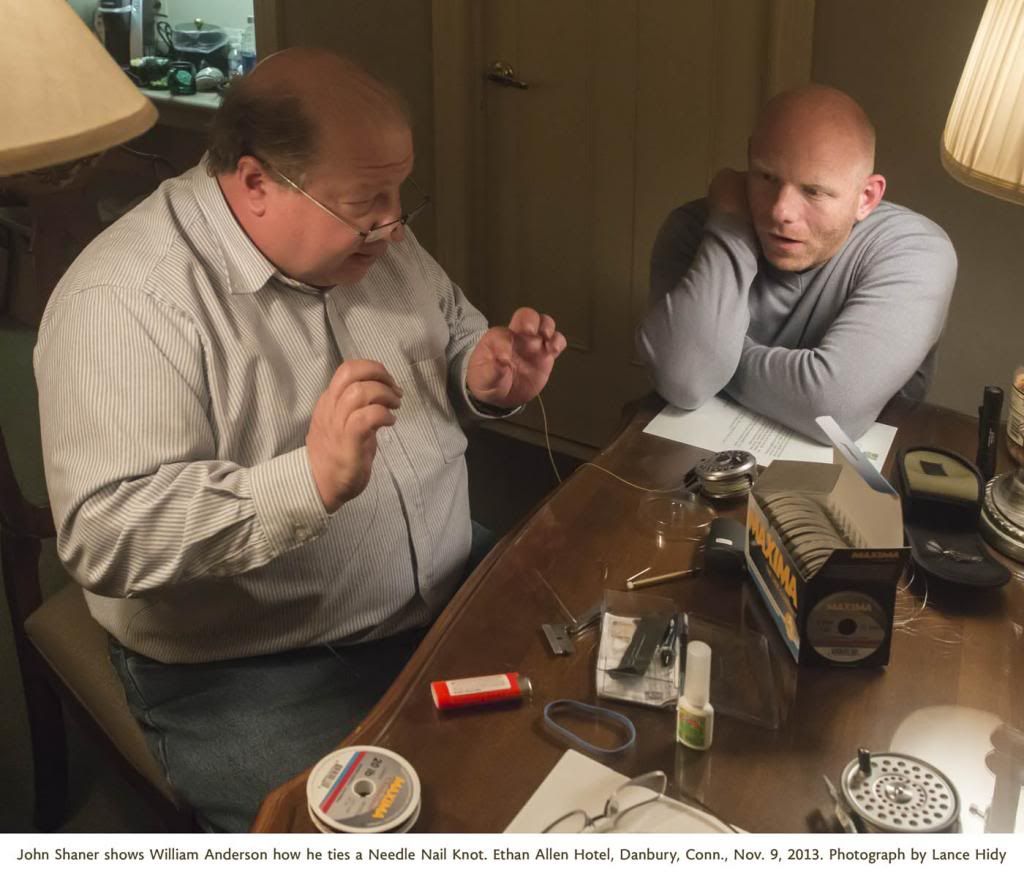
Wanting to enjoy the show, I decided not to take photographs—but one night John agreed to demonstrate the finer points of the needle nail knot for connecting leader to line. It was brilliant, so I had to turn on the camera.
The depths of John's craftsmanship in every dimension of fly fishing history and craft is known to many, but William and I had the rare opportunity to benefit from it first-hand that weekend. Here in this shot, John was putting tension on the finished knot. It created only the slightest swelling at the junction, so it would pass through the guides "slick as a mink," as John put it. The expression on William's face says it all. The desk is cluttered with required tools, including paper clip, cigarette lighter and razor blade.
For you photo nerds, this was shot hand-held at 1/200 sec, ISO 12,800.
-
- Posts: 3648
- Joined: Thu Oct 27, 2011 6:28 am
- Location: Southland, South Island, New Zealand.
Re: Master and pupil
Very cool!
You captured the moment perfectly Lance. Subject matter, lighting, composure- very "photo journalistic".
Nice to see someone else building Maxima leaders........
You captured the moment perfectly Lance. Subject matter, lighting, composure- very "photo journalistic".
Nice to see someone else building Maxima leaders........
"Listen to the sound of the river and you will get a trout".... Irish proverb.
- William Anderson
- Site Admin
- Posts: 4569
- Joined: Mon Feb 23, 2009 3:14 pm
- Location: Ashburn, VA 20148
- Contact:
Re: Master and pupil
This demonstration was weeks in the making as part of an ongoing discussion of leader design and formula characteristics. I probably have mentioned a couple times that when fishing with John he has been kind enough to offer his rod for comparison. The difference was remarkable. As I mentioned to John, I started my fly-fishing journey, in ernest, on the Letort in Carlisle PA, about 3 mins from my in-laws house. From those early days I was instructed to use a knotless tapered leader otherwise I would have weed issues to deal with, in addition to all the others problems I would face as a novice on this touchy water. I've used them ever sense and have not found them to be an issue. I've tried braided and furled leaders as well and enjoyed the ease of turning these over, but for the most part I've taken the short cut of manufactured leaders with loop-to-loop connections.
With Johns fly-rod set-up, I was amazed at the effortless turn over and delicate presentation of 14'-18' leaders. It was eye opening and I've been pestering him with questions about his set-up since.
On this night in Danbury we talked about the leaders and materials and knots and specialized uses. One of the things he took the time to demonstrate was the use of the Needle Nail Knot for the line to leader connection. It was one of the things I noticed on his set-up. I have written up a brief explanation (initiated by Lance and clarified by John) of the method he uses for his leader to line connection. I just thought it would help explain the photograph above. I would love to see another discussion of leader designs in the fishing section. There are a lot of new faces that will find this to be a fresh conversation.
"A man should not try to eliminate his complexes, but rather come into accord with them. They are ultimately what directs his conduct in the world." Sigmund Freud.
www.WilliamsFavorite.com
- William Anderson
- Site Admin
- Posts: 4569
- Joined: Mon Feb 23, 2009 3:14 pm
- Location: Ashburn, VA 20148
- Contact:
Re: Master and pupil
Needle Nail Knot – John Shaner’s Technique for connecting line to leader
Required items: Single edge razor blade, appropriately sized sewing needle or bodkin, lighter, large diameter paperclip (nail, tube, or nail knot tool, to your preference). John uses the paperclip.
There are several different ways to tie the knot; most don't include heating the needle. This method does.
1. The razor blade is used: one, to cut an acute, clean angle in the butt end of the leader material (easier to thread the leader material into the fly line once the channel is created) and two, to make a nice, clean perpendicular cut to the fly line, removing the manufacturers welded loop.
2. Insert the needle into the end of the fly line (using a pin vise if necessary, a jeweler’s tool) working it up to about one-half inch inside. You might slightly heat the needle at this point to gain a little more depth as it resists going any further.
3. Bend the line to 90* so you can cleanly exit the needle partially leaving about an inch or so of the needle exposed from the entry point and about half an inch of the point protruding from the exit point. Be very careful to avoid injuries at this point.
4. Very lightly pass a flame (the lighter) under the needle, creating just enough heat to mold a channel and stabilize an exit hole in the fly line, making it possible to insert and pass the angled leader butt into and out of the fly line through the channel. The heat helps expand and set the line, preventing it from contracting, leaving an open channel for the leader butt.
5. Holding the paperclip parallel to the fly line, tie a nail knot, pull it snug, careful to align the wraps, wet the knot and bring it tight using your rear left molars. =) The paperclip serves the purpose of he nail or tube or nail knot tool. A large paper clip is a perfect diameter and cheap and easy to find.
6. Trim the tag end of the nylon leader butt.
“The Whitlock Super Glue splice is also a super smooth connection but you need glue which always seems to be dried up in the bottle. The Needle/ Nail Knot is a mechanical connection, and the "tools" are household items, so in a pinch you can improvise everything you need to to tie it. And believe me, I've done just that many times.
A simple Nail Knot is just as strong and less fussy to tie but is a little bulkier. I use it for heavier, 6 weight and up, lines. But for the way I fish, the Needle/Nail Knot is by far the best Line to Leader connection I've used and it has served me well for many years.” J.S.
“This really is an exceptional connection and very slick. It would seem a difficulty if you were going to change leaders often, but as his leaders are all hand tied using decreasing diameter leader material, connected with blood knots, the retying of the lower end of the leader is simple enough while streamside and should last a season or more without having to recreate the line/leader connection again for some time. Another benefit is the perfect transfer of energy from the line to the leader and creating a highly tailored loop/presentation condition. John carries two reels, one for his wet fly fishing set up and another for dries and small, unweighted nymphs, fished upstream on a greased leader. Each reel is set-up to balance the reel and rod for fly line type, reel weight, leader action and leader length, given it’s specialized function. The needle knot connection seems to me a superior connection in regards to accuracy and performance. Less convenient if you’re used to a loop-to-loop connection, but with practice it seems worthwhile, especially for those who go to great pains to finesse every other aspect of their approach. I would suspect he could rebuild a hand tied leader in waist deep water using ten sections of leader material, connected with blood knots quicker than I could reattach a fresh knotless, tapered leader with a loop-to-loop connection. Consider me a convert, very excited about adding something so fundamental to my approach.” W.A.
"A man should not try to eliminate his complexes, but rather come into accord with them. They are ultimately what directs his conduct in the world." Sigmund Freud.
www.WilliamsFavorite.com
Re: Master and pupil
The needle knot connection and hand-tied leaders have been my favored rigging technique for quite some time. I have given tapered leaders and loop-to-loop connections a try now and then, but have always returned to hand-tied leaders - they just work better for me. I use an interpretation of the Harvey slack leader formula, 60% stiff/40% soft leader material. I have found the C&F needle tool to be perfect for constructing the needle nail knot.
- hankaye
- Posts: 6582
- Joined: Tue Jun 08, 2010 4:59 pm
- Location: Arrey, N.M. aka 32°52'37.63"N, 107°18'54.18"W
Re: Master and pupil
dub-ya, Howdy;
Have been a fan of the needle Knot since I first read the "Curtis Creek
Manifesto". On pg. 25 (at the top), he shows it in use to use as a method
to attach your leader by-way of a loop to loop connection. The suggested
size is 0.020" or 25 pound test line 8" long (measured from the tip of the
fly line to the base of the knot (the knot being 5/8" tall, I tyed mine around
a yellow pencil).
In the CCM he didn't mention the bits about heating and and all the finer points
that John was kind enough share. Thanks John, dub-ya, & Lance for bringing this
further out into the light , .
hank
Striving for a less complicated life since 1949...
"Every day I beat my own previous record for number
of consecutive days I've stayed alive." George Carlin
"Every day I beat my own previous record for number
of consecutive days I've stayed alive." George Carlin
Re: Master and pupil
1. This needs to be sticky'd
2. Good lord I missed out on that.
- letumgo
- Site Admin
- Posts: 13346
- Joined: Sat Feb 21, 2009 7:55 pm
- Location: Buffalo, New York
- Contact:
Re: Master and pupil (John Shanner's Needle Nail Knot Tutorial)
I found this thread buried in the Photo subsection, and decided to move it over to the tutorial section.
I got a chance to watch John doing this at Roscoe one time and later made up my own leader splicing kit.
LINK: viewtopic.php?f=19&t=7028
I got a chance to watch John doing this at Roscoe one time and later made up my own leader splicing kit.
LINK: viewtopic.php?f=19&t=7028
Ray (letumgo)----<°))))))><
http://www.flytyingforum.com/index.php? ... er=letumgo
"The world is perfect. Appreciate the details." - Dean
http://www.flytyingforum.com/index.php? ... er=letumgo
"The world is perfect. Appreciate the details." - Dean
Re: Master and pupil (John Shaner's Nail Knot Tutorial)
Only one of the numerous ingenious tricks in John's bag ... . Thanks for bringing it to light again, Ray.
Some of the same morons who throw their trash around in National parks also vote. That alone would explain the state of American politics. ~ John Gierach, "Still Life with Brook Trout"
- letumgo
- Site Admin
- Posts: 13346
- Joined: Sat Feb 21, 2009 7:55 pm
- Location: Buffalo, New York
- Contact:
Re: Master and pupil (John Shaner's Nail Knot Tutorial)
Bump
Ray (letumgo)----<°))))))><
http://www.flytyingforum.com/index.php? ... er=letumgo
"The world is perfect. Appreciate the details." - Dean
http://www.flytyingforum.com/index.php? ... er=letumgo
"The world is perfect. Appreciate the details." - Dean